
Geography & Environmental Science
GIS and Geovisualization Labs and software
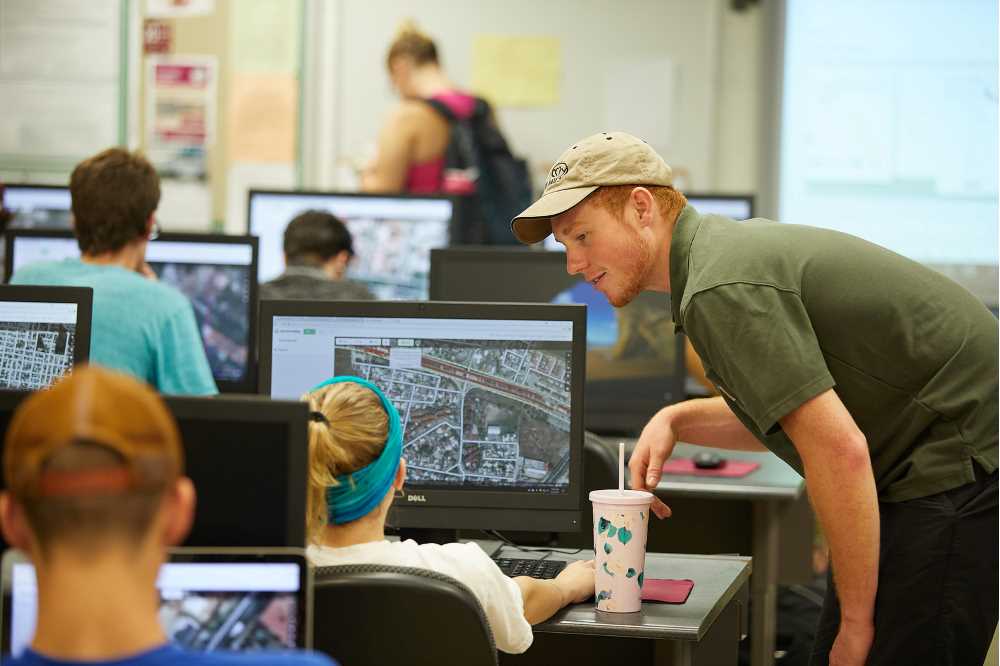
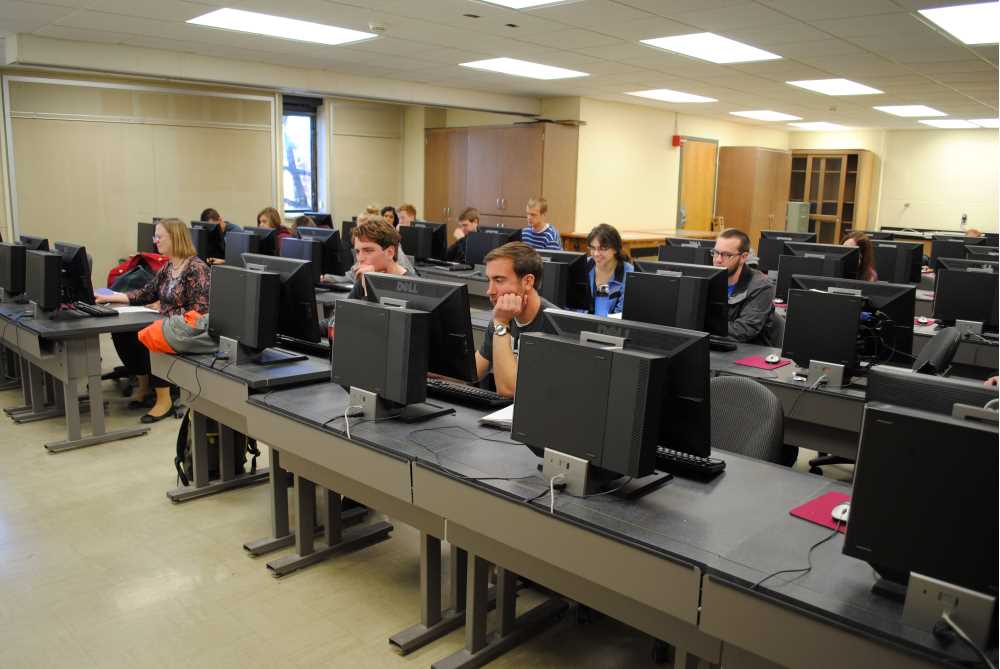
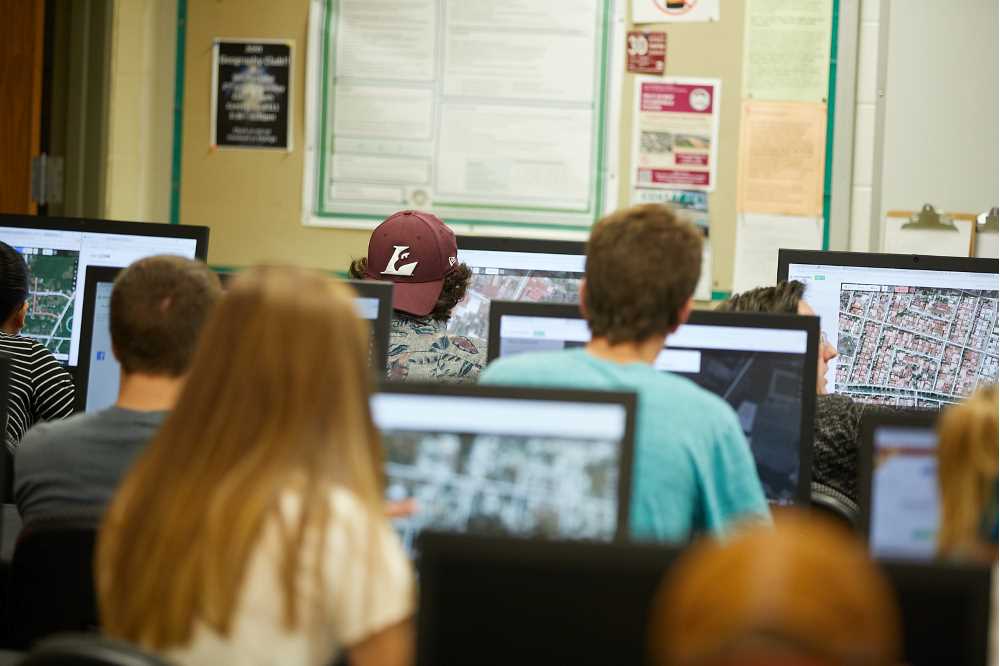
The Geography and Environmental Science Department features two state of the art GIS computer labs. Each lab is outfitted with over 30 high powered computers. Every computer hosts a wide variety of cutting-edge, industry-standard software, with applications ranging from geospatial analysis to visual editing and design.
In addition, the GIS labs provide students remote desktop access to the software, a SMART board, a scanner, and a color printer. The GIS labs are available to Geography and Environmental Science students for coursework and research projects when not in use for class.

Available GIS software
ESRI’s spatial analysis and mapping products are used throughout business, government, and academia for decision making, high impact visuals, and geospatial research. ArcGIS software from ESRI is available free of charge to all faculty, staff, and students at UW La Crosse through the Universities of Wisconsin License. Directions for accessing the various software options available to the UWL community are provided below. If you have questions about downloading, installing, and licensing the software, submit a request using this link to Steve Fulton – the Department of Geography and Environmental Science GIS Lab Manager.
If you are interested in learning more about how to use the GIS software, the Department of Geography and Environmental Science at UWL offers numerous geospatial techniques courses at the undergraduate and graduate level. Students can earn a major, minor, or certificate in Geographic Information Science.
ArcGIS Online Student Licenses
ArcGIS Online is a cloud-based GIS software offered by ESRI. ArcGIS Online is available free of charge to UWL faculty, staff, and students.
- To access ArcGIS Online, log in to uwl.maps.arcgis.com with your university credentials (username and password).
ArcGIS Pro Student Licenses
ArcGIS Pro is the next generation of desktop GIS software offered by ESRI. ArcGIS Pro is freely available to all UWL students, faculty, and staff for use within the academic environment through a UW System educational license. You need to be connected to the internet to use ArcGIS Pro on a Windows computer, but you do not need to be on the UWL network (i.e., wired or VPN).
The following options are available to access ArcGIS Pro:
- Students taking a GIS course from the Department of Geography and Environmental Science course can download the ArcGIS Pro executable from the Student Software folder in the GEO_Data shared drive. To license ArcGIS Pro, open an account on uwl.maps.arcgis.com and sign in when using the program. A Windows computer is needed that meets these minimum system requirements to use ArcGIS Pro.
To install and license ArcGIS Pro on your personal or work computer with a Windows OS:
- Log into UW La Crosse's ArcGIS Online portal at uwl.maps.arcgis.com using your UWL credentials. Select University of Wisconsin-La Crosse. The first time you access the portal it automatically creates a user account for you.
- Select your username in the upper right corner and then "My settings."
- Select "Licenses" in the left column and then "ArcGIS Pro download" from the list.
- Follow the instructions after opening the downloaded ArcGIS Pro installation file.
- For license, select "named license" and use your UWL credentials to log in.
FAQs:
- Is there training available for using ArcGIS Pro?
- Yes, ESRI (the maker of ArcGIS) provides an extensive collection of free online training for its products - including all classes "requiring maintenance," ArcGIS Online, ArcGIS StoryMaps, and other specialized pieces of ESRI software. Visit https://learn-arcgis-learngis.hub.arcgis.com/ for guided lessons.
- Can I install ArcGIS on a Mac?
- Maybe. This software does not work under any version of iOS. If you want to use ArcGIS Pro on your Mac you must run Windows on your computer using commercial software such as Parallels, VMware fusion, or bootcamp. Installation and usage are beyond the scope of this document. Alternatively, you can use ArcGIS Online through a browser on a Mac or there are Free Open-Source Software (FSS) similar to ArcGIS Pro such as GRASS or QGis.
- What are the minimum computer requirements to use ArcGIS Pro?
- Computer requirements are available here. In summary, minimum requirements include:
- Windows 10 computer with two (2) physical cores
- Eight (8) GB of memory (RAM)
- 32 GB of disk space
- Additional RAM and disk space will improve your experience.
- Computer requirements are available here. In summary, minimum requirements include:
- Do I need to be on the UWL campus network to download or use ArcGIS Pro (wired or VPN)?
- No. You only need an internet connection.
- Does the ArcGIS Online site provide access to ArcMap (ArcGIS Desktop)?
- No. ArcMap is being replaced by ArcGIS Pro. If your project requires ArcMap, contact the Department of Geography and Environmental Science GIS Lab Manager by submitting a request using this link.
- Can I install ArcGIS Pro on a UWL computer?
- Many UWL computers already have ArcGIS Pro pre-installed and licensed on them, including all open access lab computers. If your UWL work or research computer does not, you may be able to install it using the "Software Center" on your computer or by following the directions above. You will need to have administrative rights on the computer to complete the install.
Please contact Department of Geography and Environmental Science GIS Lab Manager at gislab@uwlax.edu if you have any questions or submit a request using this link.
ArcGIS Desktop (ArcMap) Student Licenses
ESRI is transitioning away from ArcGIS Desktop and is suggesting that users move to ArcGIS Pro or ArcGIS Online. ArcGIS Desktop is available free of charge to UWL faculty, staff, and students.
The following options are available to access ArcGIS Desktop:
- Students taking a GIS course from the Department of Geography and Environmental Science course can download the ArcGIS Desktop executable from the Student Software folder in the GEO_Data shared drive. Students must submit a request to the GIS lab manager to obtain the license code before using the software. A Windows computer is needed that meets these minimum system requirements to use ArcGIS Desktop
- Faculty and staff that require a license for their work computer should submit a request to the GIS lab manager using this link.
- Any faculty, staff, or student can log into a computer in Murphy Library or the other general access computer labs. ArcMap and ArcGIS Pro are installed and licensed on them for all users.
ERDAS Imagine Student Licenses
ERDAS Imagine by Hexagon Geospatial is a remote sensing software used by geographic imaging professionals. ERDAS has some similarities to ArcGIS, but it is more focused on processing and analyzing images acquired through remote sensing methodologies. Licenses to this software are available free of charge to UWL students.
- To install ERDAS Imagine on your Windows computer, submit a request to the GIS lab manager using this link.
ENVI Student Licenses
ENVI is the industry standard image processing and analysis software. It is used by image analysts, GIS professionals, and scientists to make critical decisions and solve difficult problems with confidence.
ENVI is only for those taking advanced GIS classes.
DOWNLOADING ENVI:
Students taking a GIS course from the Department of Geography and Environmental Science course can download the ENVI zip (windows) or pkg (Mac) file from the Student Software folder in the GEO_Data shared drive.
INSTALLING ENVI:
Windows – Extract the file. Double click “envi563-win.exe” to start the installer. Follow the prompts to complete the installation. Do not install the Geospatial Service Framework (second last window on the setup). Run the license Administrator.
Mac - Run the the “envi564-mac.pkg” file and follow the prompts. Do not install the Geospatial Service Framework (second last window on the setup). Run the license Administrator.
LICENSING:
You can request an activation code from gislab@uwlax.edu for a “Node Locked” license or use a “Floating” license. The differences:
- Node Locked license allows you to use your computer anywhere without connecting to the UWL VPN – but you only get 1 license good on only 1 computer.
- To access, select “Activate Local License” and enter the Activation code supplied
- Floating license requires you to connect to the UWL VPN to use ENVI, but you can use it on multiple computers.
- To access, select “Use License Server” – and enter “wngapp07-new.intra.uwlax.edu” then connect.
Additional Software in GIS Labs
UWL has access to other ESRI products such as Business Analyst through the current license agreement. If you are interested in this, or other ESRI products available to the UWL community, submit a request to the GIS lab manager using this link.
The Department of Geography and Environmental Science houses two GIS computer labs, each outfitted with 30 computers. Every computer hosts a wide variety of cutting-edge, industry-standard software, with applications ranging from geospatial analysis to visual editing and design.
This list includes
| ArcGIS | Adobe Design Premium | eCognition | ENVI |
| ERDAS Imagine | Feature Analyst | Hypack | IBM SPSS Statistics |
| LAStools | Leica Cyclone | MAPublisher | Pix4d |
| Quick Terrain Modeler | RStudio | Terrset | Trimble Pathfinder Office |
| USGS Velocity Mapping Toolbox |
The GIS computer labs are not general access labs open to the campus community. The software in these labs can be used by faculty and students for approved educational purposes. Contact the Chair of Geography and Environmental Science, Colin Belby, to inquire about use of the software in the GIS computer labs.
Process for Accessing GEO Drives and Lab Remote Desktop
Included here is the process for accessing the UWL drives and virtual desktops. Each document below is accompanied by a video tutorial that is linked near the end of the document’s first paragraph. It is recommended that you use a combination of the PDF and the video.
Connecting to UWL's Network and Mapping GEO Drives
If you want to do is connect to the UWL network and map your personal computer to the GEODATA drives, follow these directions.
If mapping the drives from an off campus location, you need to connect to UWL's VPN by following the Connecting to UWL's VPN directions below. If you are on campus and connected to the campus internet, then skip ahead to the Mapping the GEODATA Drives directions below.
Connecting to UWL's VPN (Virtual Private Network)
These directions provide guidance on connecting to UWL remotely so that individuals may access their files saved on the network (e.g., GEODATA drives) while off campus. These directions are taken from those provided by ITS.
What is the VPN (Virtual Private Network)
UWL's VPN service allows any UWL associate to connect to campus remotely from any available network connection almost anywhere in the world: including from home, from many hotels, and even from within some company networks.
All campus computers should be deployed with a VPN client (Cisco AnyConnect) that faculty and staff members can use. Logging into the VPN client allows access to campus resources like network storage. If you do not have the VPN client (e.g., you are using a personal computer), then you will need to install it on your computer using KnowledgeBase article linked below.
How do I Get Started?
Detailed directions for downloading and installing the Cisco AnyConnect VPN client can be found in this KnowledgeBase article created by ITS.
*NOTE: Upon initial login, for the first time you may need to enter in vpn.uwlax.edu into the empty box before being able to continue on.
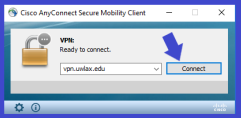 Login for UWL VPN
Mapping the GEODATA Drives
These directions provide guidance on how to map the GEODATA drives to your computer if you are on campus and connected to the campus network OR if you are connected to the campus network through the Cisco VPN client. These directions are for mapping network drives from a Windows PC.
Do not use the VPN to map and access the GEODATA drives if you are on campus and connected to the campus network. Only use the VPN when off campus.
How Do I Get Started?
- Connect to the UWL network through the VPN if mapping drives on your personal (local) computer only if you are not on campus. Otherwise, skip this step.
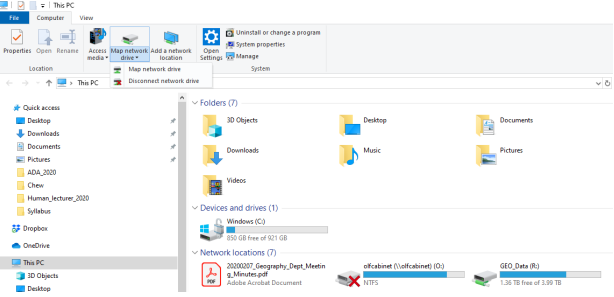
- Open the File Explorer on your computer (looks like a yellow folder)
- Single click on the "This PC" icon located on the left side of the window.
- Click the "Map network drive" dropdown found at the top of the window and select "Map network drive."
 Directions to Map Network Drive
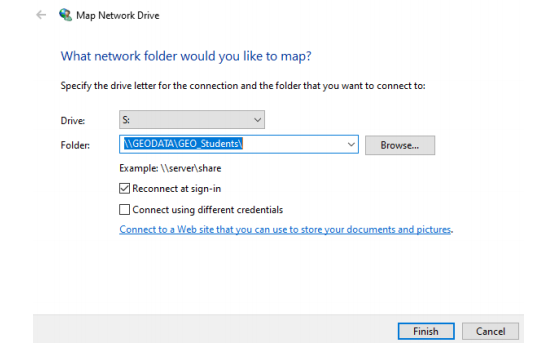
 - Select the appropriate drive letter from the dropdown and enter the folder path as follows (see image on the screenshot after #7)
- T: \\GEODATA\GEO_Faculty\ (note that students don’t have access to this drive)
- S: \\GEODATA\GEO_Students\
- R: \\GEODATA\GEO_data\
- Place a check mark in the "Reconnect at sign-in" box so your computer automatically connects to the mapped drives if you are on the campus network.
- Click Finish
 GEODATA Folder Path
Connecting to the UWL Windows Virtual Desktop
If you want to connect to the UWL windows virtual desktop (WVD) offered by Open Access Labs (NOT the GIS labs) follow these instructions provided by the ITS KnowledgeBase.
Connecting to the Geography Department’s GIS Lab Remote Desktop
If you want to connect to the GIS lab remote desktop, follow the instructions below.
The GIS lab remote desktop has all the open-access lab software plus the Geography Department’s specialized software.
Remotely Connecting to a GIS Lab Workstation
These directions provide guidance on remotely connecting to a computer housed in one of the Geography and Environmental Science Department's GIS labs (204A or 245 Cowley). The remote desktop option is available to students with access to a folder on the GEO drive.
What is the GIS Remote Desktop
The remote desktop allows GIS students to use their Windows-based computer or Mac to virtually connect to one of the approximately 60 GIS lab workstations that are available. The virtual desktop will look like those in Cowley 204A and 245. Students will have access to all the software installed on the GIS workstations. The computing takes place on the GIS workstation, eliminating the need to install and run software on a home computer.
Important Items to Keep in Mind When Using the GIS Remote Desktop
- Only use log into the VPN if accessing a GIS lab computer from off campus.
- When working on assignments, it is recommended you download the assignment instructions to your (local) computer for easier viewing.
- If you are using the VPN, do not stream anything - this will slow things down.
- Disconnect from the remote desktop when finished AND disconnect from the VPN.
- Do not attempt to shut down the remote desktop.
- Save your work to either your Student Drive or OneDrive.
How to Remotely Connect to a GIS Lab Computer
- If working off-campus, first install and connect to the Cisco AnyConnect VPN client using the directions provided in a separate document. If working on-campus using the UWL network, do not run the VPN client.
- Go to the following link using your preferred web browser.
- Select one of the available GIS lab computers by clicking on "Connect."
- Download and open the connection file by clicking "Download" on the window that appears.
 Remotely Connect to a GIS Lab Computer
 - Open the .rdp file that is downloaded. If you receive the message below, click "Connect.". For Mac users you need to edit the *.rdp file by appending ".intra.uwlax.edu" to the full address. Example CWL-204-C-72 becomes CWL-204-C-72.intra.uwlax.edu - before opening the *.rdp file
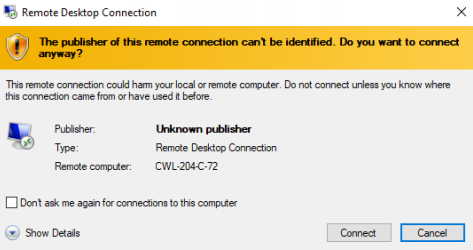 Remote Desktop Connect Message
 - Enter your NetID and password. Click "OK." The remote desktop will open on your computer.
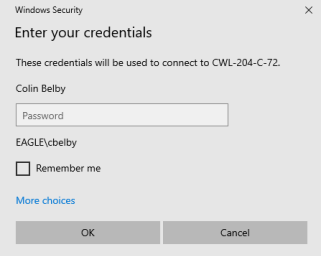 Entering Credentials to Access Remote Desktop
 - You may need to map your network drives (e.g., GEO_Students, GEO_Data) if they are not listed when in the File Explorer. Directions for doing so are provided in a separate account.
Do not save files to the remote desktop. Use your student folder on the GEO server or cloud storage to save data.
Remote Desktop Software Issue
There are two pieces of software that are known to not start properly in Remote Desktop. They are Applied Imagery Quick Terrain Modeler and Google Earth Pro. If you get an error or nothing happens when you try to start one in a remote desktop then the following should fix the problem.
If the problem persists email gislab@uwlax.edu or contact your instructor.
To Fix the issue -
Quick Terrain Modeler
Quick Terrain Modeler Fix
- After connecting to a GIS Lab Remote Desktop right-click on an empty part of the desktop and select "Display settings"
- Then select "Graphics settings"
- Leave the pull-down menu set to "Desktop app" and click on browse
- Browse to and select "C:\Program Files\QTModeler_820_UX\QTModeler.exe" and click add
- In the grey box titled "QT Modeler" select "Options"
- Then select "Power saving" and then "Save"
If you are asked about the license:
- In the window titled "FlexNet License Finder"
- Select "Specify the License Server System" and then "Next>"
- in the new window, enter "wngapp07-new" in the text box and click "Next>"
- Finally click "Finish"
Google Earth Pro
Google Earth Pro Fix
- After connecting to a GIS Lab Remote Desktop right-click on an empty part of the desktop and select "Display settings"
- Then select "Graphics settings"
- Leave the pull-down menu set to "Desktop app" and click on browse
- Browse to and select "C:\Program Files\Google\Google Earth Pro\client\googleearth.exe" and click add
- In the grey box titled "QT Modeler" select "Options"
- Then select "Power saving" and then "Save"
Get AnyConnect
To Get AnyConnect on you Mac or Windows computer
Open a browser to vpn.uwlax.edu
Log in as requested
Select AnyConnect from the left menu.
Download App and install