Registration Tips & Tricks
A page within Records & Registration
Tips & tricks:
General education courses - how to find
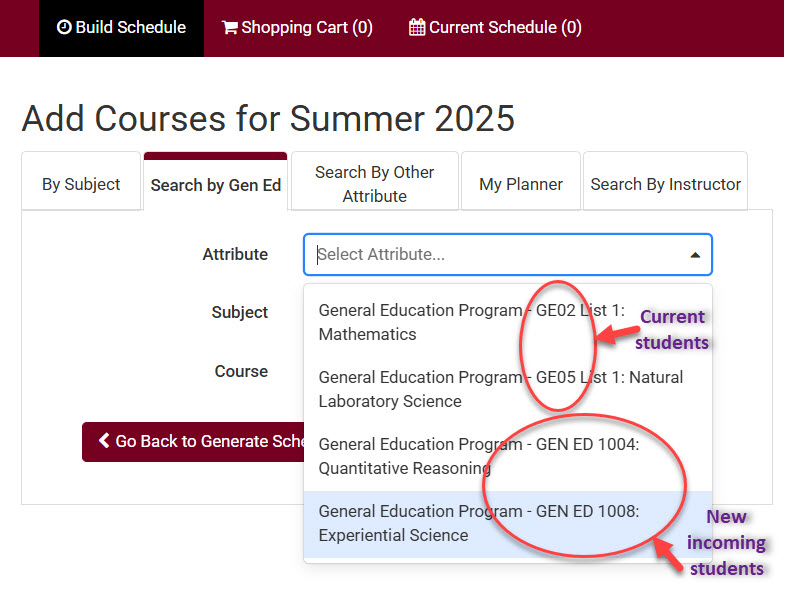
Schedule Planner has the ability to find courses in General Education categories by using the "Search by Gen Ed" tab on the Add Courses page.
Important: New general education categories begin starting Summer 2025 for students who start at UWL in the Summer of 2025 or later. These new categories begin with GEN ED 1001, GEN ED 1002, etc. Students who started at UWL in the Spring of 2025 or earlier should go by the general education categories that start with GE01, GE02, etc."
If you need assistance determining which category you should search by:
- Current students: Go by your Advisement Report.
- Incoming new students: New General Education Program
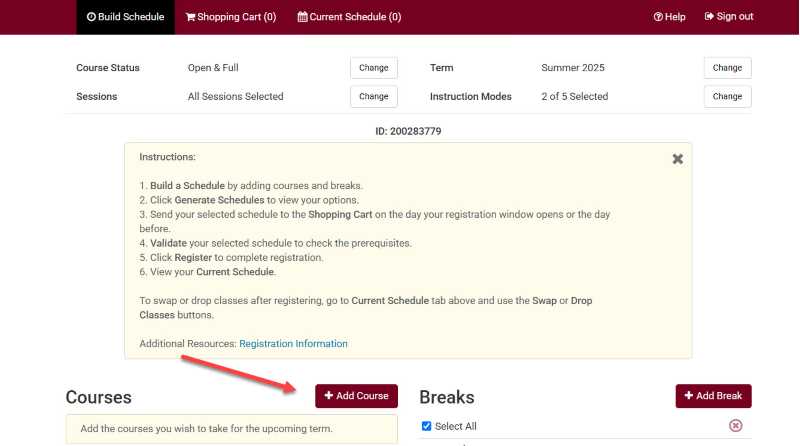 Click Add Course to search for courses in Schedule Planner.
 Search by GE or Gen Ed Course
Search for Classes/Timetable - can only search by one GE category at a time. Select General Education Program from Course Attribute, and then select the category you want to search from the Course Attribute Value.
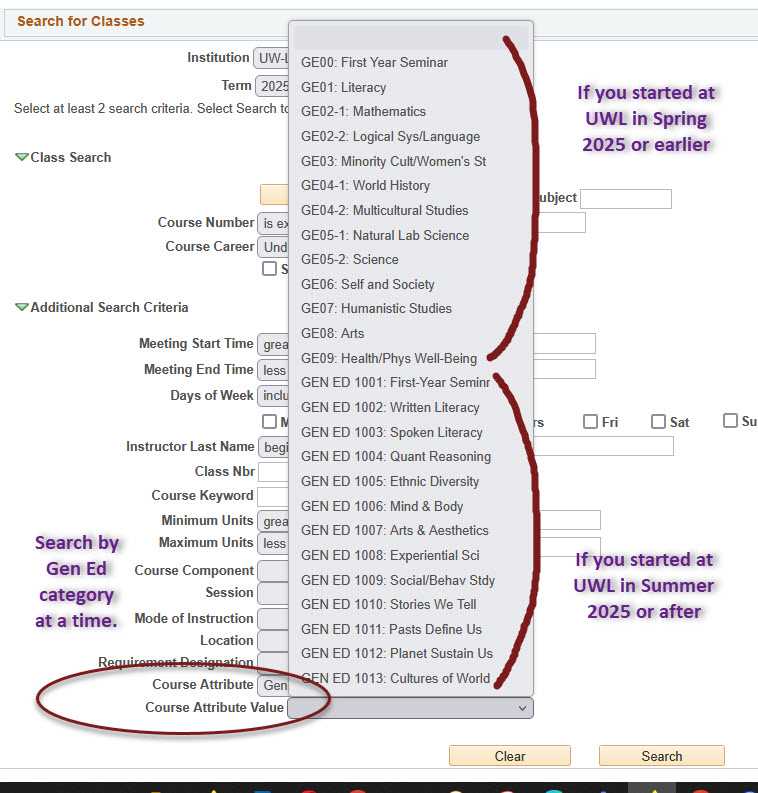 GE Courses - Search for Classes
Overrides - if given an electronic permission to add
Electronic overrides can be used through the first 10 days of the semester (deadline is shorter for shorter classes) and are given out by the instructor, the department, or the college dean's office, depending on the restriction being overridden.
Once you are given an electronic override, you must finish registering for the class using WINGS or Schedule Planner.
Log into WINGS. Use either the "Enroll" link to register through WINGS or use the "Schedule Planner" link to register. Add the class to your shopping cart and finish the enrollment process as normal.
- Closed classes:
- If permission was given to enroll in a closed class, the class will still appear closed, but you will be able to register anyway.
- Do NOT check the wait list box when adding if the permission was to get into a closed course.
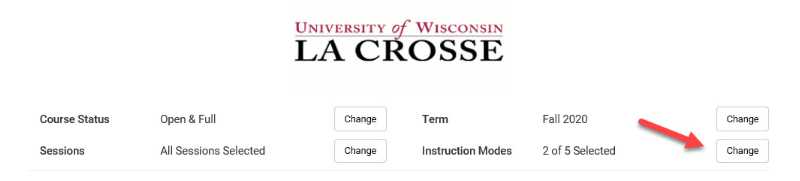
- In Schedule Planner: Make sure to set the Course Status filter to "Open & Full" to include closed and full classes in your search.
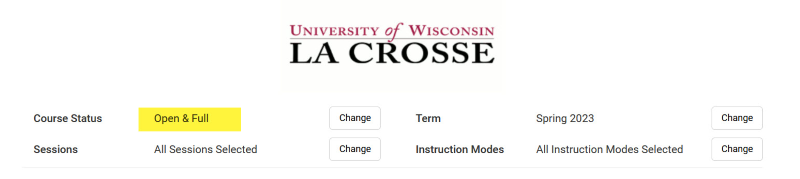 Change the Course Status to Open & Full status in Schedule Planner.
- Wait lists: the course will still look closed when you go to register.
- In Schedule Planner, you should drop off the wait list first before re-adding the class to your shopping cart.
- When the permission overrides the closed class restriction, do not select the wait list check box when adding the class
- When the permission overrides the prerequisite requirements, but you do not have permission to get into a closed class, you should check the wait list box when adding the class and get on the wait list. If a spot opens up in the class, you will be enrolled by the system at that time.
- Not able to find a class in Schedule Planner: Check the filters! Make sure to set the Course Status filter to "Open & Full" to include closed and full classes in your search. If you still can't find the class, check the other filters, especially the instruction modes, to see if they may be filtering out the class you need.
 Change the correct filter in Schedule Planner to make sure your results include the class you are looking for.
- If you get an error when registering: First review the error message you received. Next, verify the section number and what type of override was given with the instructor or academic department. Sometimes the permission is put on the wrong section. If you verified you are enrolling in the correct section with the correct permission but still get an error, contact the contact the Records and Registration Office at records@uwlax.edu or 608.785.8951 for assistance.
Swapping in WINGS
Registering for a 2nd choice class as a placeholder? Use SWAP, not ADD for your first choice!
- Register for your 2nd choice class like normal
- Choose the SWAP option to register for your 1st choice
- Choose your 2nd choice class in the "Swap This Class" selection
- Enter your 1st choice class in the "With This Class" selection and click Next
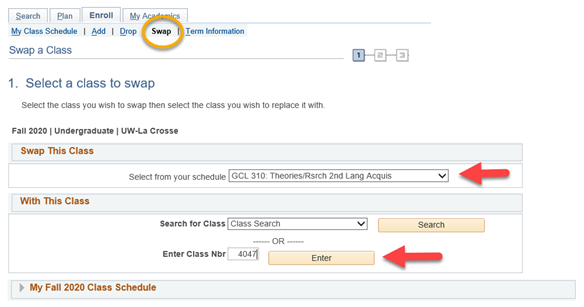 First, select classes to swap
5. Check "Wait list if class if full" on the next screen. Click Next.
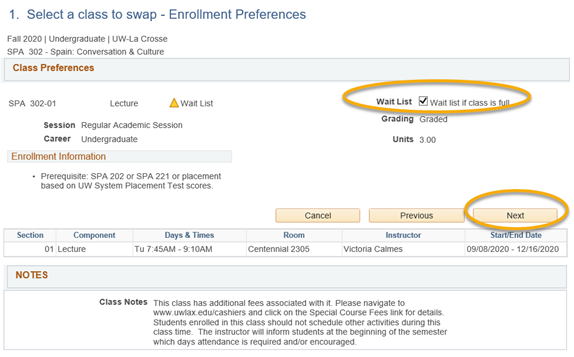 Next, check the Wait List if Class is Full box
6. Click "Finish Swapping." If successful, you will be given a wait list number. If a seat opens up and you are first on the wait list, your 2nd choice class will be dropped and you'll be added to the wait listed class.
More help documents are on the WINGS Help page, under the Wait List section.
Errors when registering
After clicking "finish enrolling" in the registration process, you will see either a green check mark or a red X on the last page. The green check mark means you were successfully enrolled. The red X means you were not enrolled, and a message will appear. Always read the error message so you know why the process failed. Below screenshot is an example error.
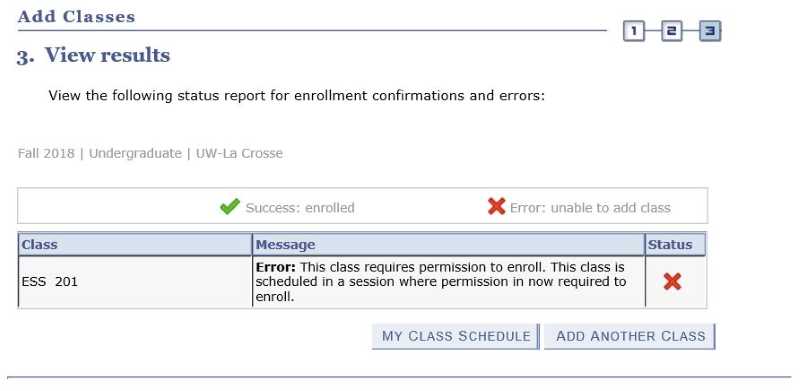 Permission required to enroll
Here are some of the most common errors:
- Class is full/closed.
- A blue box indicates closed classes when you're looking in the schedule of classes. A green circle means open/available seats.
- You can request an override from the instructor. However, the instructor may say no, based on room size or if the class itself is able to handle additional students.
- You do not meet one or more of the prerequisites.
- You can request an override from the instructor. However, the instructor may say no, as prerequisites are intended to ensure students have the necessary background learning to succeed in the class.
- Time conflict
- Remember that shorter classes, like 2nd half semester classes, don't show up in the weekly calendar view if an earlier week is displaying.
- You will likely need to drop something else if you need this class.
- Time conflicts require dean's office approval to override, and are only given on a very limited basis.
- Holds
- Go back to your WINGS homepage and find the "Holds" section on the right-hand side. Click on Details to find out more about the hold and who to contact.
- The most common are advising holds and financial holds.
- Going over maximum number of credits
- Undergrad can register up to 18 credits per semester, and grad students up to 15 credits.
- Contact your dean's office if you want to take additional credits. Please remember that additional credits means additional tuition/fees.
- Permission is required
- Class has started, and it is after the last day to add without permission; OR class requires every student to get permission from the instructor to get in.
- If it is on or before the last day to add with permission, your instructor can give you an electronic override, if they agree.
If you already have electronic permission to enroll from your instructor, please remember:
- Classes will still appear closed. You will be able to complete registration for it as long as the override was set up correctly.
- If you have tried to register and still get one of the above errors, the override may not be set up correctly. You can contact your instructor to check or come to the Records office to double-check.
Schedule Planner filters affect search results
Schedule Planner has four basic filters at the top of the screen that affect what courses will find. If you are not seeing the course results you expect, check the options at the top first to see if they are filtering out the course.
 Schedule Planner offers several different filters to help you narrow down your courses. Check the filters if you are not finding the courses you expect.
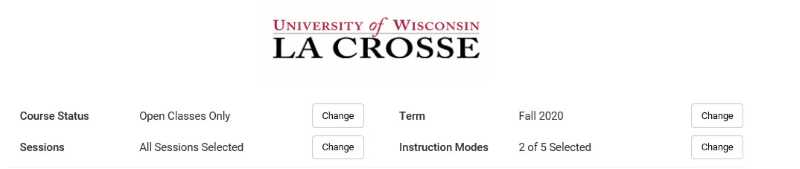
Course Status: Would you like to see only the course sections that have open seats? Change it to "Open Classes Only." Use the "Open & Full" to find a class if you are registering with a class permission/override.
Term: If you missed selecting the correct term when you first logged in, or if you are done with one term and ready to check out another, change this filter.
Sessions: Leaving the "All Sessions Selected" will give you the best results. However, if you are interested in courses that start only in the second session, you can change that here. In addition, for the Summer term, this filter is handy when trying to find courses that start on a specific session.
Instruction Modes: Leaving the "All Instruction Modes Selected" will give you the best results. However, if you are interested in only online classes or only in-person and hybrid classes, this is the filter to use to change that.
IMPORTANT: Your chosen filters stay after you leave Schedule Planner, so the next time you bring up the application, you will see the same choices on that term. Be sure to check your filters every time you bring up Schedule Planner to ensure you are finding the courses you want.
Schedule Planner favorite schedules
Have several Favorite schedules set up ahead of time to give yourself more options on your day of registration. Set them up early and then wait until the day of your registration appointment to send your preferred schedule to the shopping cart. This makes it easy to see whether seats are still available in your preferred schedules and saves time if you need to make changes because you won't need to drop classes out of the shopping cart first to generate new schedules.
- After generating some potential schedules, click View next to one of them to see the details. You can then scroll through the possible schedules using the arrows on the next screen.
- When you find a schedule to save, click on the "Favorites" heart icon at the top to save it.
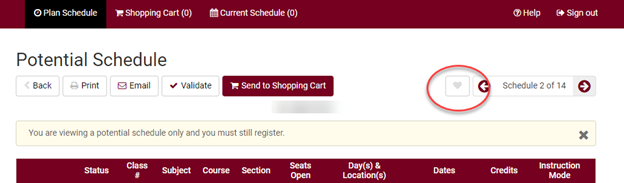 When reviewing schedules, use the heart icon at the top to save a schedule as a Favorite.
- Enter a name to help keep track of which saved schedule is which. Click OK when done.
- You may go back to the top and keep scrolling through the schedules. If you find another possibility, follow the same steps to make it a Favorite but give it a different label.
- You can have as many favorites as you want. To edit them further, go to the Plan Schedule page and find the tabs near Generate Schedules button.
 In this example, there are three schedules saved as Favorites.
- When your registration appointment starts, you can review the schedule and see if there are still open seats. If one of your Favorites has a class that is full, you can move onto the next Favorite schedule.
IMPORTANT: Saving a Favorite schedule does not reserve you a seat in the class. You must wait until your registration appointment starts, send the schedule to your Shopping Cart, and then register.
More directions on how to search for classes and generate schedules can be found on the WINGS help page.
Wait lists - how to add
With only a few exceptions, course wait lists are set up to auto-enroll you into the class:
- when a seat opens up,
- if you meet the prerequisites,
- if there are no time conflicts,
- if there are no holds on your account,
- if it doesn't put you over 18 credits,
- and if you are first on the wait list to meet all these requirements.
The auto-enrollment happens once a day in the afternoon between 4:15-5pm. If a seat opens up after 5pm and you are first on the wait list, the system won't enroll you until the next afternoon.
Department-controlled wait lists are usually classes with lecture/lab components (i.e. CHM 103). They can also be classes where the department/instructor wants to approve students enrolling. Putting yourself on the wait list lets the department know you are interested, but they will still choose from the list who gets enrolled. If you aren't sure if the wait list is department-controlled, contact them to check.
How to add to a wait list:
Classes that have a yellow triangle in WINGS for their status are full but have a wait list.
 A wait list yellow triangle
Classes in Schedule Planner with a Wait list will have a "Waitlist Open" number under the blue info button next to the section. (You must also have the open & closed option on for your filter in Schedule Planner.)
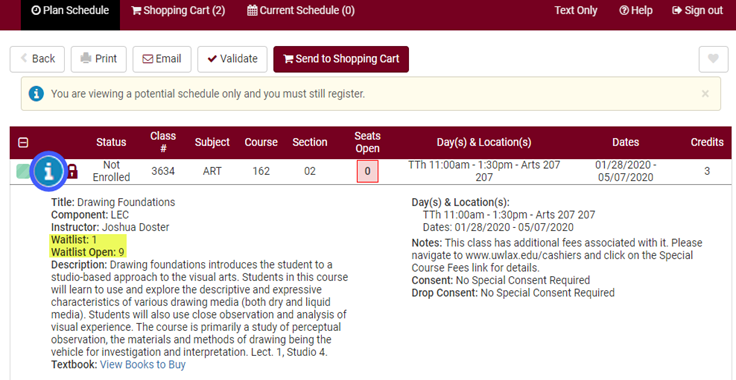 Schedule Planner's information button shows the wait list information.
When adding the course to your shopping cart, look for the "wait list if class is full" option in WINGS or the "Wait List?" option in Schedule Planner and check that box before clicking Next or Finish. In Schedule Planner, you can also add yourself to the Wait List after the course is already in your Shopping Cart by editing the Cart and clicking the Wait List box there.
If you get on the wait list, you'll see a green check mark and be given a wait list position number. In your schedule, the class will appear with a status of "Waiting" or "Wait Listed."
Full directions are on the WINGS Help page.
Wait lists - additional tips
Do not swap from one wait list to another wait list. That can cause issues in the auto enroll process. Drop yourself off the one wait list and then add yourself to the other.
12 credit limit - You can only be on 12 credits of wait lists, so use them carefully. Putting yourself on additional sections of a wait list for the same course may be detrimental if you need to also put yourself on the wait list for several other classes. Which class is the most important to get in? Do you have any backups that can also work?
Errors - If the system tried to put you in but was not able to, you will receive an email in your UWL email from the Records & Registration office. That email will list what the error is. Until that error is solved, you won't be able to get into the class. You are only sent one email about this, so best practice is to check your email daily if you are on a wait list.
Overrides - If given an electronic override for a class you are on the wait list for:
- You must finish the process by registering for the class using WINGS or Schedule Planner, and you must do this before the permission expires.
- Register for the class like normal.
- Do NOT select the wait list check box.
- You do not need to drop off the wait list first.
More help documents are on the WINGS Help page, under the Wait List section.
Online courses - how to find
Schedule Planner:
The instruction mode filters in Schedule Planner allow you to select multiple instruction modes. Choose Online Asynchronous and/or Online Synchronous to find only online classes.
 In Schedule Planner, which is linked in your WINGS account, click on the Instruction Modes "Change" button in the filters at the top to narrow down your results to just online sections.
 The instruction mode filters in Schedule Planner allow you to select multiple instruction modes. Choose Online Asynchronous and/or Online Synchronous to find only online classes.
Search for Classes/Timetable
The Search for Classes function in WINGS will only allow you to search by one mode of instruction at a time or by all of them. So you will need to select either asynchronous or synchronous for the Mode of Instruction field, in the Additional Search Criteria.
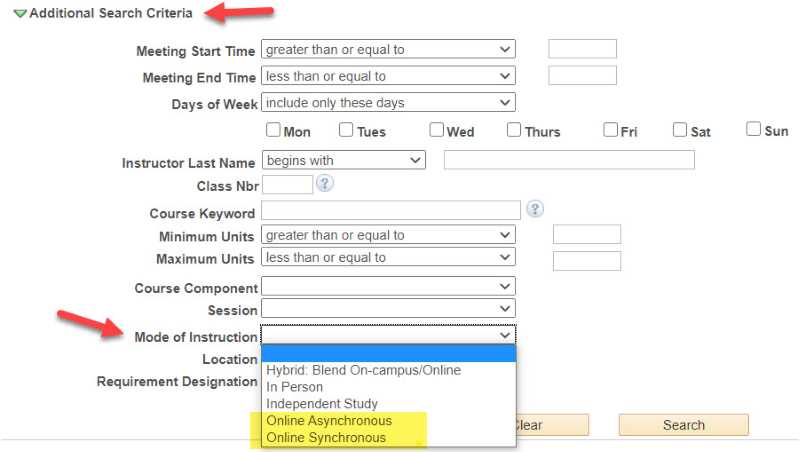 In the Search for Classes function in WINGS or in the public timetable, the additional search criteria section has the option to filter on modes of instruction. Scroll there to select between Online Asynchronous or Online Synchronous.
Open classes - how to find
Schedule Planner: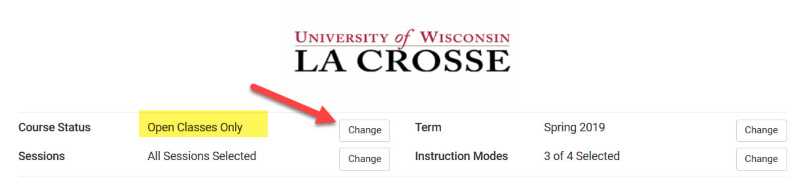 Schedule Planner Open Courses
Search for Classes/Timetable:
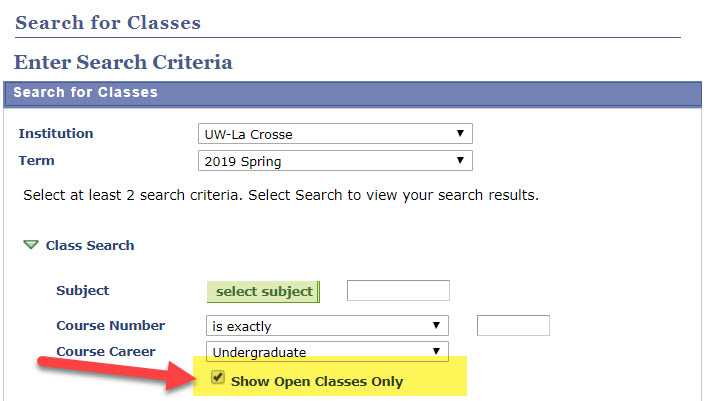 Open classes - using Search for Classes
Course topics (a.k.a. subtopics) - how to view
Schedule Planner
In Schedule Planner, click on +Add Course from the Build Schedule page.
When a course has a subtopic, an additional Topic field appears after you have selected the course. You must select a topic to add the course to your list. To try out multiple topics in your schedule, add the course multiple times to your list, each time with a different topic.
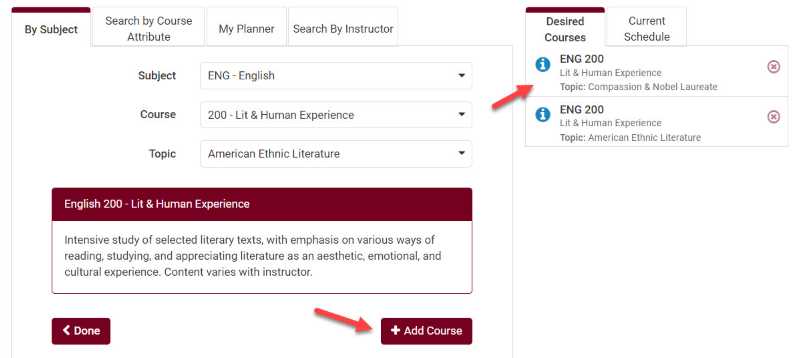 Select each topic individually to add to your list.
To see the description for the topic, after you have added the topic to your course list and have returned to the main page, click on the Options button.
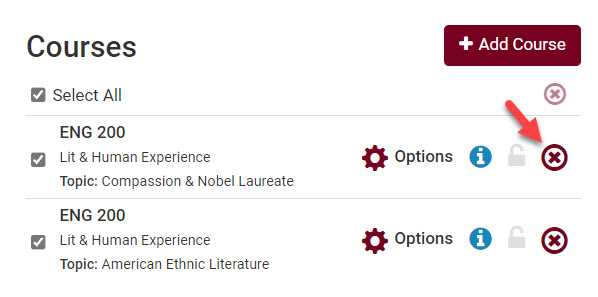 Click on Options next to the course in your Course List.
Then click on the small 'i' circle for more information. The topic description will be under the Notes. Click on Show More if the description is long enough.
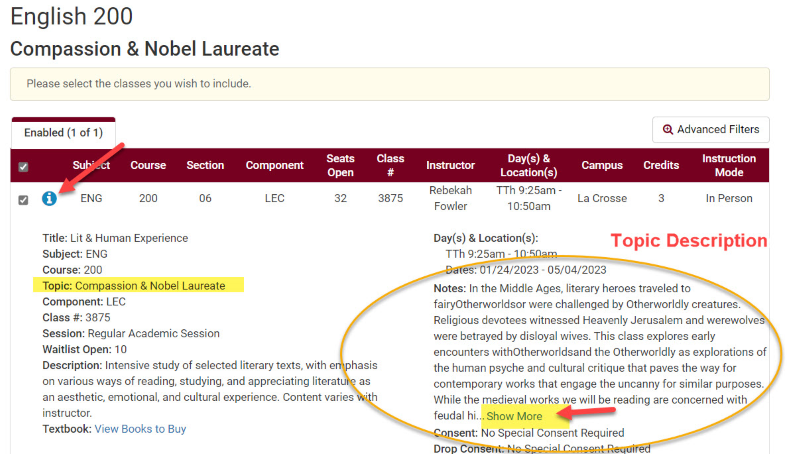 Click on the 'i' circle to view the notes for the section, including the subtopic description.
WINGS Class Search
If a course has a topic, you will see it in the search results underneath the section.
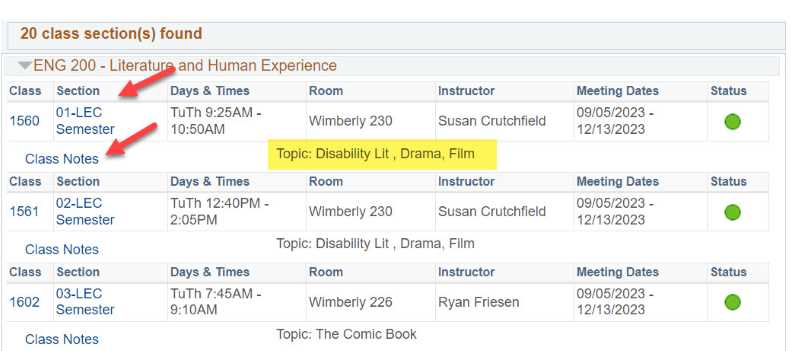 Click on the links under the Class or Section column to view class details.
You will also see it when you view the class details. The Class and Section columns link to the class details. In the class details, the topic is listed in the Meeting Information, and the topic/subtopic description is listed in the Class Notes. The course's main description from the catalog is at the bottom.
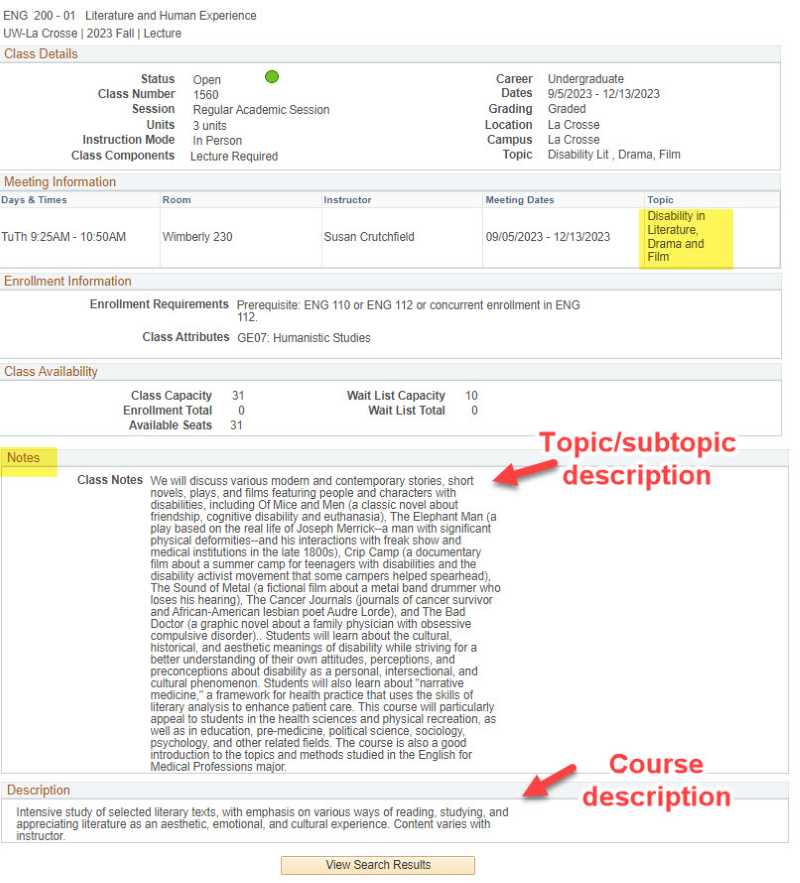 Class details include the topic title in the Meeting Information and the topic description in the Class Notes.
Half-semester or special dated courses - how to find
Schedule Planner:
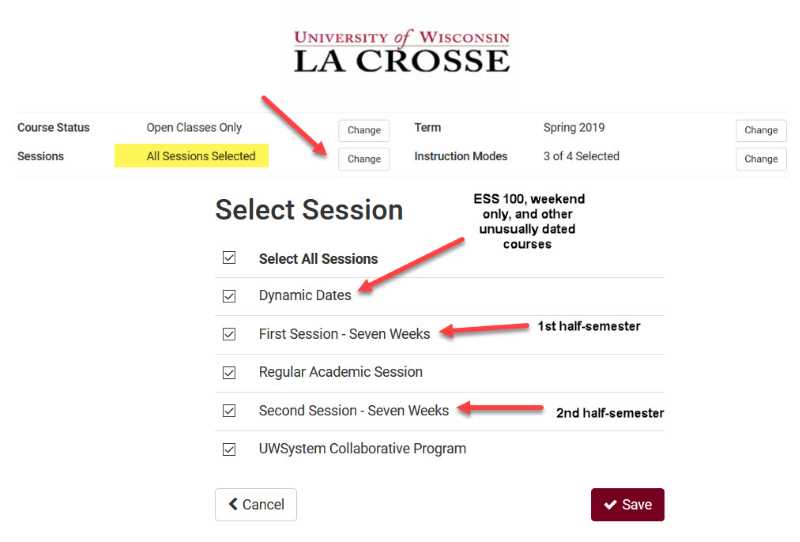 Change Sessions in Schedule Planner
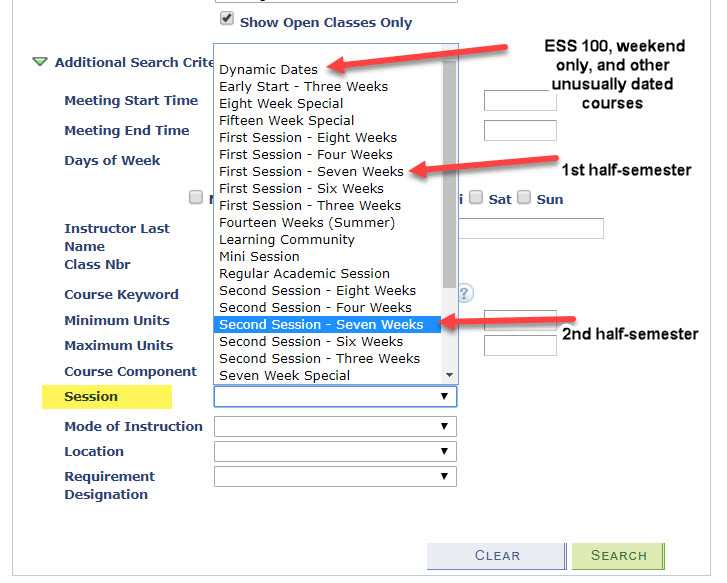 Searchable Timetable Sessions
Writing emphasis courses - how to find
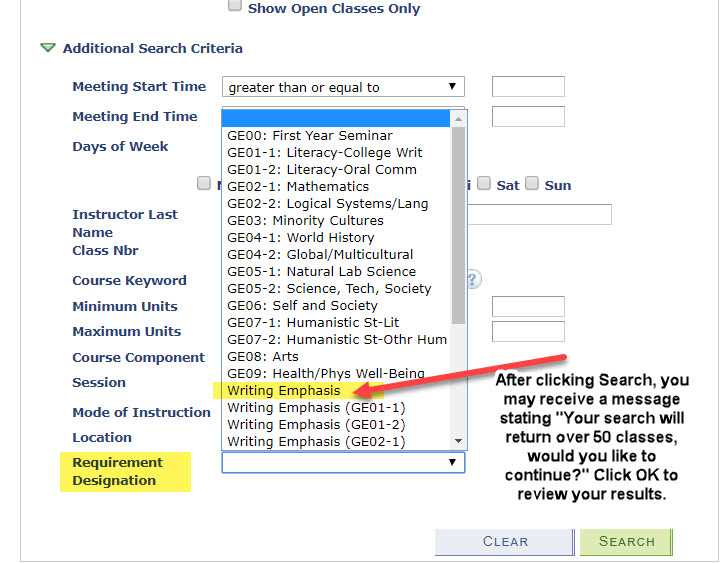 Find writing emphasis course in Timetable
Shopping carts
How shopping carts work: Classes have to be in your shopping cart before you can register for them. Add courses directly to your shopping cart using "Search for Classes" in WINGS or the Schedule Planner link. When you find your preferred schedule in Schedule Planner or you've selected a specific class to enroll in, click "Send to Shopping Cart" at the top. This puts the classes into your shopping cart in both Schedule Planner and WINGS so you have your preferred schedule ready for registration, which is a separate step. Having a class in your shopping cart does not reserve you a seat.
Be aware that seats can fill up quickly. You can add classes to your cart before your appointment starts. However, having a course in the shopping cart does not reserve you a seat, so putting it in your cart too early may cause you to miss when the seats fill up. Check that the section you added to your shopping cart still has open seats once your registration appointment starts.
Important: Shopping carts have to be activated each term. You'll be able to tell when your shopping cart is activated because an appointment for it will appear in your WINGS Student Center under the Enrollment Dates section.
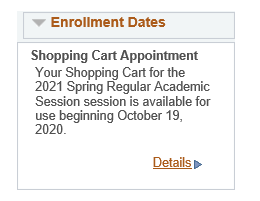 Your shopping cart appointment will appear under the Enrollment Dates section in your WINGS.
Please note that the Shopping Cart Appointment is not the same as your Enrollment (Registration) Appointment, which will be listed underneath after it has been assigned. Once the Enrollment Appointments are assigned, you will see something like this:
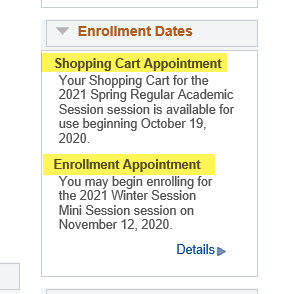 The shopping cart appointment will appear above the enrollment appointment.
Remember to click on "Details" to see the Enrollment Appointment for other terms.